반응형
vue에서는 컴포넌트를 활용하여 재사용을 높일 수 있는데, 어떤 화면 경우 굉장히 비슷한 UI 및 기능을 가지고 있으면서 아주 일부부만 다른 경우가 있다. 이런 경우 slot을 사용하여 컴포넌트의 재사용성을 좀 더 높여줄 수 있다. 예를들면, Alert팝업, Confirm팝업 등과 같이 팝업 화면이 있을 수 있다.
샘플 코드를 통해 간단히 slot의 기능을 이해해본다
먼저 slot이 정의된 컴포넌트를 작성한다.
<template>
  <div class="modal-container">
    <header>
      <!-- Named Slot -->
      <slot name="header"></slot>
    </header>
    <main>
      <!-- Default  Slot -->
      <slot></slot>
    </main>
    <footer>
      <!-- Named Slot -->
      <slot name="footer"></slot>
    </footer>
  </div>
</template>
<style scoped>
.modal-container {
  border: 1px solid #ddd;
}
</style>
위 코드에서 <sloat name="..."> 으로 name이 지정된 slot을 Named Slot이라고 하고, name이 없는 slot을 Default Slot이라고 한다.
이제 위의 컴포넌트를 사용하는 부모컴포넌트를 작성한다.
<template>
  <SlotModalLayout>
    <template #header>
      <h1>Slot1</h1>
    </template>
    <template #default>
      <p>Alert</p>
    </template>
    <template #footer>
      <button type="button">닫기</button>
    </template>
  </SlotModalLayout>

  <SlotModalLayout>
    <template #header>
      <h1>Slot2</h1>
    </template>
    <template #default>
      <p>Confirm</p>
    </template>
    <template #footer>
      <button type="button">저장</button>
      <button type="button">닫기</button>
    </template>
  </SlotModalLayout>
</template>

<script>
import SlotModalLayout from "./SlotModalLayout";
export default {
  components: { SlotModalLayout },
};
</script>
자식 컴포넌트를 import하고 2번 사용을 하는 코드인데 template 태그를 사용하여 자식컴포넌트에서 선언한 slot 영역을 대체한다. 이때 v-slot이나 #을 이용하여 slot의 이름을 지정할 수 있다. 이름이 없는 slot은 default로 지정한다.
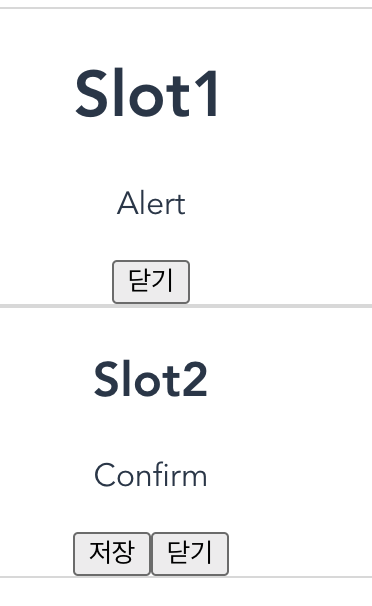
코드를 실행하면 아래와 같은 결과를 확인할 수 있다.
반응형
'개발 > Vue.js' 카테고리의 다른 글
| Vue.js Google 로그인 연동하기 (0) | 2024.03.15 |
|---|---|
| Vue.js 네이버 로그인 연동하기 (1) | 2024.03.14 |
| Vue.js emit 이해 및 사용(자식컴포넌트 -> 부모컴포넌트 이벤트/데이터 전달) (0) | 2024.03.07 |
| Vue.js computed와 watch 이해하기 (0) | 2024.03.03 |
| Vue.js Bootstrap - Uncaught TypeError: Cannot read properties of undefined (reading 'prototype') (0) | 2022.04.10 |


댓글