SpringBoot로 백엔드 개발 시 API 도큐먼트를 위해 swagger를 많이 사용한다. 예전에는 springfox-swagger를 사용하여 적용하였는데 최근에 많이 사용되는 springdoc을 이용해서 swagger 설정을 해본다. 참고로 springfox-swagger는 2020년부터 업데이트가 되지 않고 있다.
1. 의존성 추가
gradle에 현재 최신 버전의 springdoc-openapi-ui 라이브러리 의존성을 추가한다.
implementation 'org.springdoc:springdoc-openapi-ui:1.6.9'
2. 어플리케이션 실행
추가 설정없이 의존성만 추가하고 어플리케이션을 실행한 후 http://server:port/context-path/swagger-ui.html(ex. http://localhost:8080/swagger-ui.html) 로 접속 해본다. 기본 설정을 바탕으로 아래와 같이 swagger UI화면을 볼 수 있다.

추가적으로 http://localhost:8080/v3/api-docs를 입력하면 json 형식의 api doc정보를 확인할 수 있고, http://localhost:8080/v3/api-docs.yaml 을 입력하면 yaml형식으로도 아래와 같이 확인이 가능하다.

3. application.yml 기본 설정
application.yml의 기본 설정 샘플은 아래와 같다.
springdoc:
  default-consumes-media-type: application/json
  default-produces-media-type: application/json
  api-docs:
    groups:
      enabled: true
  swagger-ui:
    operations-sorter: alpha # alpha(알파벳 오름차순), method(HTTP메소드순)
    tags-sorter: alpha # 태그 정렬 기준
    path: /swagger-ui.html # html 문서 접속 경로
    disable-swagger-default-url: true
    display-query-params-without-oauth2: true
    doc-expansion: none # tag, operation 펼치는 방식
  paths-to-match:
    - /**
기타 많은 설정들이 있는데 자세한 내용은 다음을 참조한다. https://springdoc.org/#properties
4. OpenApi 빈 설정
아래와 같이 Api info를 설정하고 OpenAPI 빈을 간단히 설정한다.
@Configuration
public class OpenApiConfig {
    @Bean
    public OpenAPI openAPI() {

        Info info = new Info()
                .version("v1.0.0")
                .title("API 타이틀")
                .description("API Description");

        return new OpenAPI()
                .info(info);
    }
}
Swagger UI에서 위의 설정에 대한 내용을 확인 할 수 있다

5. Controller Annotation 설정
@Tag(name = "데모", description = "swagger 데모 api 입니다.")
@RestController
@RequestMapping("/swagger")
public class SwaggerTestController {

    @Operation(summary = "demo 조회", description = "demo 조회 메서드입니다.")
    @ApiResponses(value = {
        @ApiResponse(responseCode = "200", description = "조회 성공", content = @Content(schema = @Schema(implementation = User.class))),
        @ApiResponse(responseCode = "400", description = "Bad Request", content = @Content(schema = @Schema(implementation = Error.class)))
    })
    @GetMapping("/test")
    public ResponseEntity<User> getTest(@Parameter(description = "사용자 id")String userId){
        return ResponseEntity.ok(User.builder()
                .userId("user1")
                .userNm("홍길동")
                .age(20).build()
        );
    }
 }
위에서부터 하나씩 보면
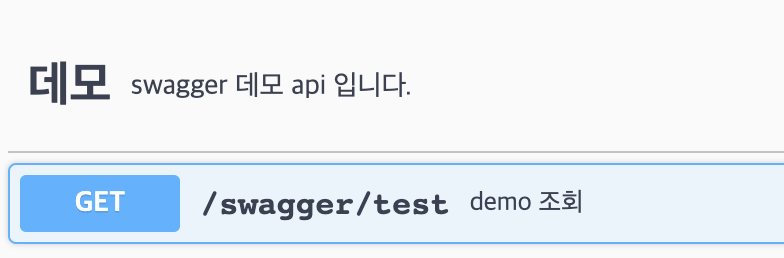
@Tag는 API 그룹 설정을 위한 어노테이션이고, @Operation은 각 API를 위한 어노테이션이다. Swagger UI에서 보면 아래와 같다
@Parameter는 파라메타에 대한 설명, @ApiResponses는 각 Api응답에 대한 설명을 나타낸다. Swagger UI에서 보면 아래와 같다

6. @Schema 어노테이션 설정
@Schema를 사용하여 API 주고받는 객체 및 각 필드에 대한 상세 정보를 작성할 수 있다
@Setter @Getter
@Builder
@Schema(description = "사용자 DTO")
public class User {
    @Schema(description = "사용자 ID", nullable = false, example = "user1")
    private String userId;

    @Schema(description = "사용자 이름", nullable = false, example = "홍길동")
    private String userNm;

    @Schema(description = "사용자 나이", example = "20")
    private int age;

    @Schema(description = "사용여부", defaultValue = "Y", allowableValues = {"Y", "N"})
    private String useYn;
}
적용 후 Swagger UI에서 API의 응답 부분을 확인하면 아래와 같이 나온다.


여기까지 간단한 설정을 알아봤는데 추가적인 많은 설정들이 있어서 자세한 내용은 다음 공식 사이트를 참조해야 한다.
OpenAPI 3 Library for spring-boot
Library for OpenAPI 3 with spring boot projects. Is based on swagger-ui, to display the OpenAPI description.Generates automatically the OpenAPI file.
springdoc.org
'개발 > SpringBoot' 카테고리의 다른 글
| SpringBoot Redis 세션 사용 (0) | 2022.09.06 |
|---|---|
| SpringBoot SpringDoc(OpenAPI)을 이용한 Swagger 그룹화, 전역인증&Parameter 설정 (0) | 2022.08.03 |
| SpringBoot Log4jdbc 를 사용한 Mybatis 쿼리 로그 출력 (0) | 2022.06.05 |
| SpringBoot InMemory DB(H2) 사용 (0) | 2022.05.31 |
| SpringBoot Embedded Tomcat 세션 클러스터링 (0) | 2022.05.30 |


댓글